
How To Build A Tiny House Using Timber
Framing your tiny house is an exciting part of your tiny house build. It is where the whole shape and major design comes to life! To see the placement of your windows, any internal walls, the loft and the roof take shape is a very exciting part of the process. It is also a part of the build which tends to take shape fairly quickly once you have all of the tools, materials and plans ready to go. In this article I’m going to cover all areas to do with framing up your tiny house. From what materials you can use, to the tools needed and how to actually do the work to a professional standard.
Before starting this step it is fairly crucial that you at least have a hand sketched drawing of what you are going to create and how you will do this. This drawing is called a framing plan and looks like the image below.
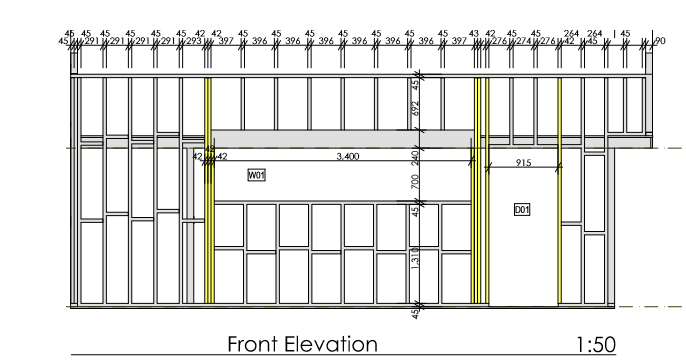
If you haven’t yet drawn up a bit of a plan then refer to our “I want to build a tiny house! Where do I start?” blog post for lots of helpful info on how to do this. If you are like a lot of people and are not computer or design savvy then this step may be best left to the professionals. This is where our professional design team of qualified Architects can help. You can get a free quote on your very own custom tiny house design here!
Assuming now that you have already insulated and capped your trailer and you have your drawings in hand you are now ready to make some serious progress! If you haven’t yet insulated and capped off your trailer then read & watch more about this in our Insulating & Capping Your Tiny House Trailer blog post.
What Building Material Do I Build My Tiny House From?
Deciding on what material to use to build your tiny house from is a consideration that needs to take place even before the designing and plans can be completed. The main considerations when selecting the right material for a tiny house are structural integrity and cost. The structural integrity and specific characteristics of a material are especially important with a tiny house build as the material will undergo some very unique forces due to the home being transportable. This introduces elements that wouldn’t usually be present in a typical house build such as vibrations, bumps from the road when in transit, wind sheer when travelling at speed and the day to day flexing, expanding and contracting of a trailer chassis.
If all of these considerations seem extremely overwhelming to consider and you have no idea what I’m talking about there is no need to worry. That is all a normal part of the process of learning something new and that is exactly why we now have a team of Architects and Structural Engineers who specialise in working all of this out for you so you don’t have to even think about it.
There are millions of different types of building materials out there but only a couple that are suitable for tiny house building.
The 3 main material types that are tried and tested for tiny house building and they are:
-
Timber – In Australia we use H2 treated structural pine
-
Steel
-
Structurally Insulated Panels (SIPS)
Timber Framing
Timber framing of houses has been around a very long time. If you have ever seen a house being built in Australia then you have probably seen the occasional timber framed house over the years. The pine used for timber framing is great because it is a renewable resource, it comes from mother nature and Is treated for termites. It is also reasonably cheap compared to other materials and is easy to work with. These are the main reasons why this material seems to be the go to for tiny house builders world wide.
Steel
Steel framed houses are a relatively new kid on the block historically speaking. It is only in the last 20 years or so that this type of construction has become more mainstream. With improvements in manufacturing processes and machinery it is now a much more affordable option.
So what are the benefits with using steel. It is the strongest of the 3 materials and is also the lightest. It is also not subject to any problems with termites or any pests.
According to thumb and hammer.com it is also about 10% more expensive though than timber when comparing two identical walls, one made from timber and one from steel. According to research conducted by the Australian government it is also one of the most energy intensive materials to produce which isn’t a great thing. Another point to consider if using this option is the specialised tools required to get the job done. There are a few extra tools that you will need that are not typical wood working tools. So factoring the cost of purchasing these tools also needs to come into the overall consideration.
Structurally Insulated Panels
Structurally Insulated Panels or SIPS for short is a material made from 3 individual layers that are pressed together to form a single panel that is very well insulated, strong and lightweight.
SIPS have actually been around a long time but it hasn’t been until recent years that they have come back into the limelight due to more competitive pricing and exposure. The first insulated panels were actually created in the 1930’s but didn’t become popular until the 70’s.
So what are benefits and what are the downsides to SIPS. On the upside they are incredibly lightweight, they have great thermal ratings and are very quick and easy to install compared with regular timber construction. The time saved in construction labour is said to make up for the added cost of the material.
From our research we have found that a timber framed tiny house including the walls, the roof, steel strapping, external sheathing, insulation and internal linings totals around $3,400. In comparison a pre-cut set of SIPS panels that are delivered to site all ready to screw together for the same size tiny house come in at around $5,500. So the downsides are quite obviously cost but also embodied energy. They are not as environmentally friendly as timber construction due to the manufacturing processes used to construct the panels.
What Fixings Should I Use For A Timber Frame?
What fixings to use when building your wall and roof frames from timber is another very important consideration in the overall project as it will effect the overall structural integrity and longevity of the finished product. Your two main choices of suitable fixings are:
- Nails; or
- Screws
Timber frame construction is usually carried out using a framing nail gun such as the one pictured below which makes the job very quick and easy. The only downside to this method for tiny house building is that nails can work there way loose over time with the vibrations and movement on the road whereas screws will hold a lot tighter for a lot longer. The downside to using screws is that the whole framing process ends up taking longer. There is no right or wrong answer here it is purely a matter of choice. However, it is worth checking with your structural engineer on your particular design as to what will work better for your unique scenario. Other factors such as the type and amount of bracing you use on top of your framing will also play a part in which option is best.
What Tools Will I Need To Build My Tiny House Wall Frames?
To build the wall frames for your tiny house out of timber you will need a few simple woodworking tools. These may include:
- Compound Mitre Saw or Circular Saw
- Cord or Cordless Drill/driver
- Extension Lead
- Nail Gun (if using nails)
- Quick Grip Clamps
- Hammer
- Wrench
- 13mm drill bit (if using M12 bolts or studs)
- Tape Measure
- Pen/Pencil
- Adjustable Square
- Screws/Nails
- 3mm drill bit (if using 12-14g screws)
How To Build Timber Frames For Your Tiny House
If you do end up opting for timber framing like the majority of tiny house builders the following step by step guide will help you through the process.
- Choose a wall to start with – There is no right or wrong here just select your first wall to build. Working in a sequence can help though so starting in a corner and working clockwise around the trailer can help you to keep track of where you are up to.
- Grab your plans and make a list of lengths of timber to cut for the first wall.
- Once you have a cut list mark your timber and cut it using a compound mitre saw, circular saw or jig saw. The former will make it easier if you have access to one! Mark on your timber the length of each piece so it is easy to know where it must go when assembling the wall.
- We are going to build the wall frames on the floor so using a flat surface such as a garage floor or concrete slab begin laying out the freshly cut pieces in their correct locations on the floor.
- Once all the pieces of the wall are laying in their correct locations we need to double check our plans and measure using our tape measure to ensure that the overall length and height are correct as well as any window and door placements.
- If anything is slightly out then now is the time to make the necessary adjustments to ensure it is all perfect.
- If you are screwing your frames together you can screw straight into the timber but it is a lot easier to pilot drill your holes first. To do this use a drill bit slightly smaller than the size of the screw you are using.
- Now you are happy it is time to start fixing the timber together using your fixing of choice. Either nails or screws.
- Start by fixing your outside corners first to lock in the overall dimensions.
- Now check for square by taking two diagonal measurements. Start from the outside of one corner and measure across to the opposite corner on a diagonal. Remember this number and do the same the opposite way. Comparing the two numbers will tell you if your frame is square or lop sided. Straighten it up now if you need to.
- Begin fixing each connection one at a time and making sure to hold all of the parts nice and steady whilst doing so. Generally where two timbers join they will need two fixings. Either two nails or two screws but check your drawings to make sure there are no special requirements.
- Congratulations! You have just built your first wall frame!
- Repeat steps 1 – 11 for each subsequent wall frame until they are all completed.
Handy Tip: Once you have finished your wall frames stack them in a neat pile near the trailer so when it comes time to stand them it is easy to get to them to do so. Also make sure you build the frames in order so when you stand them you will have the previous frame to fix to. It makes life a little easier!
Standing Your Walls

Once all of your wall frames are completed it’s time to start standing them up but before starting this step you want to make sure you have a few things ready to go:
- Enough helping hands to lift the frames
- Your screws and driver or nails and nail gun
- A hammer
- Some quick grip clamps (2 usually does the job)
- Your nuts and washers to go on your mounting studs
- A power cord near where you are standing your first frame
- A drill with a 13mm drill bit if your mounting studs are M12 in size (ie 12mm)
- Adjustable wrench
Ok you are now ready to go! Lift your first frame into position and whilst your helping hands hold it there measure and drill your holes for your mounting studs to poke through the bottom of your wall frame. You can also do this on the floor if you would prefer but I found it more difficult. Once all of the holes are drilled and you have double checked there position lift the frame up and over the studs and lower it into position. If you have drilled accurately this should be a simple and pain free exercise. Now put on your large washers and nuts onto your mounting studs and gently tighten them using an adjustable wrench. Just lightly tighten them at this stage as we may need a bit of movement when we join the next frame to this one. Just enough to hold it firmly and safely in place.
Congratulations! You have just stood your first wall frame on your own house!
Now repeat this process for each remaining frame.
Where there are two frames butting into each other you will need to securely fasten them together. Refer to your framing drawing for details on this. If it is not detailed then use at least a 14g x 75mm screw at 300mm centres. Use some good clamps to help make sure everything is aligned whilst you carry out this step.
Fixing Your Framing To The Trailer
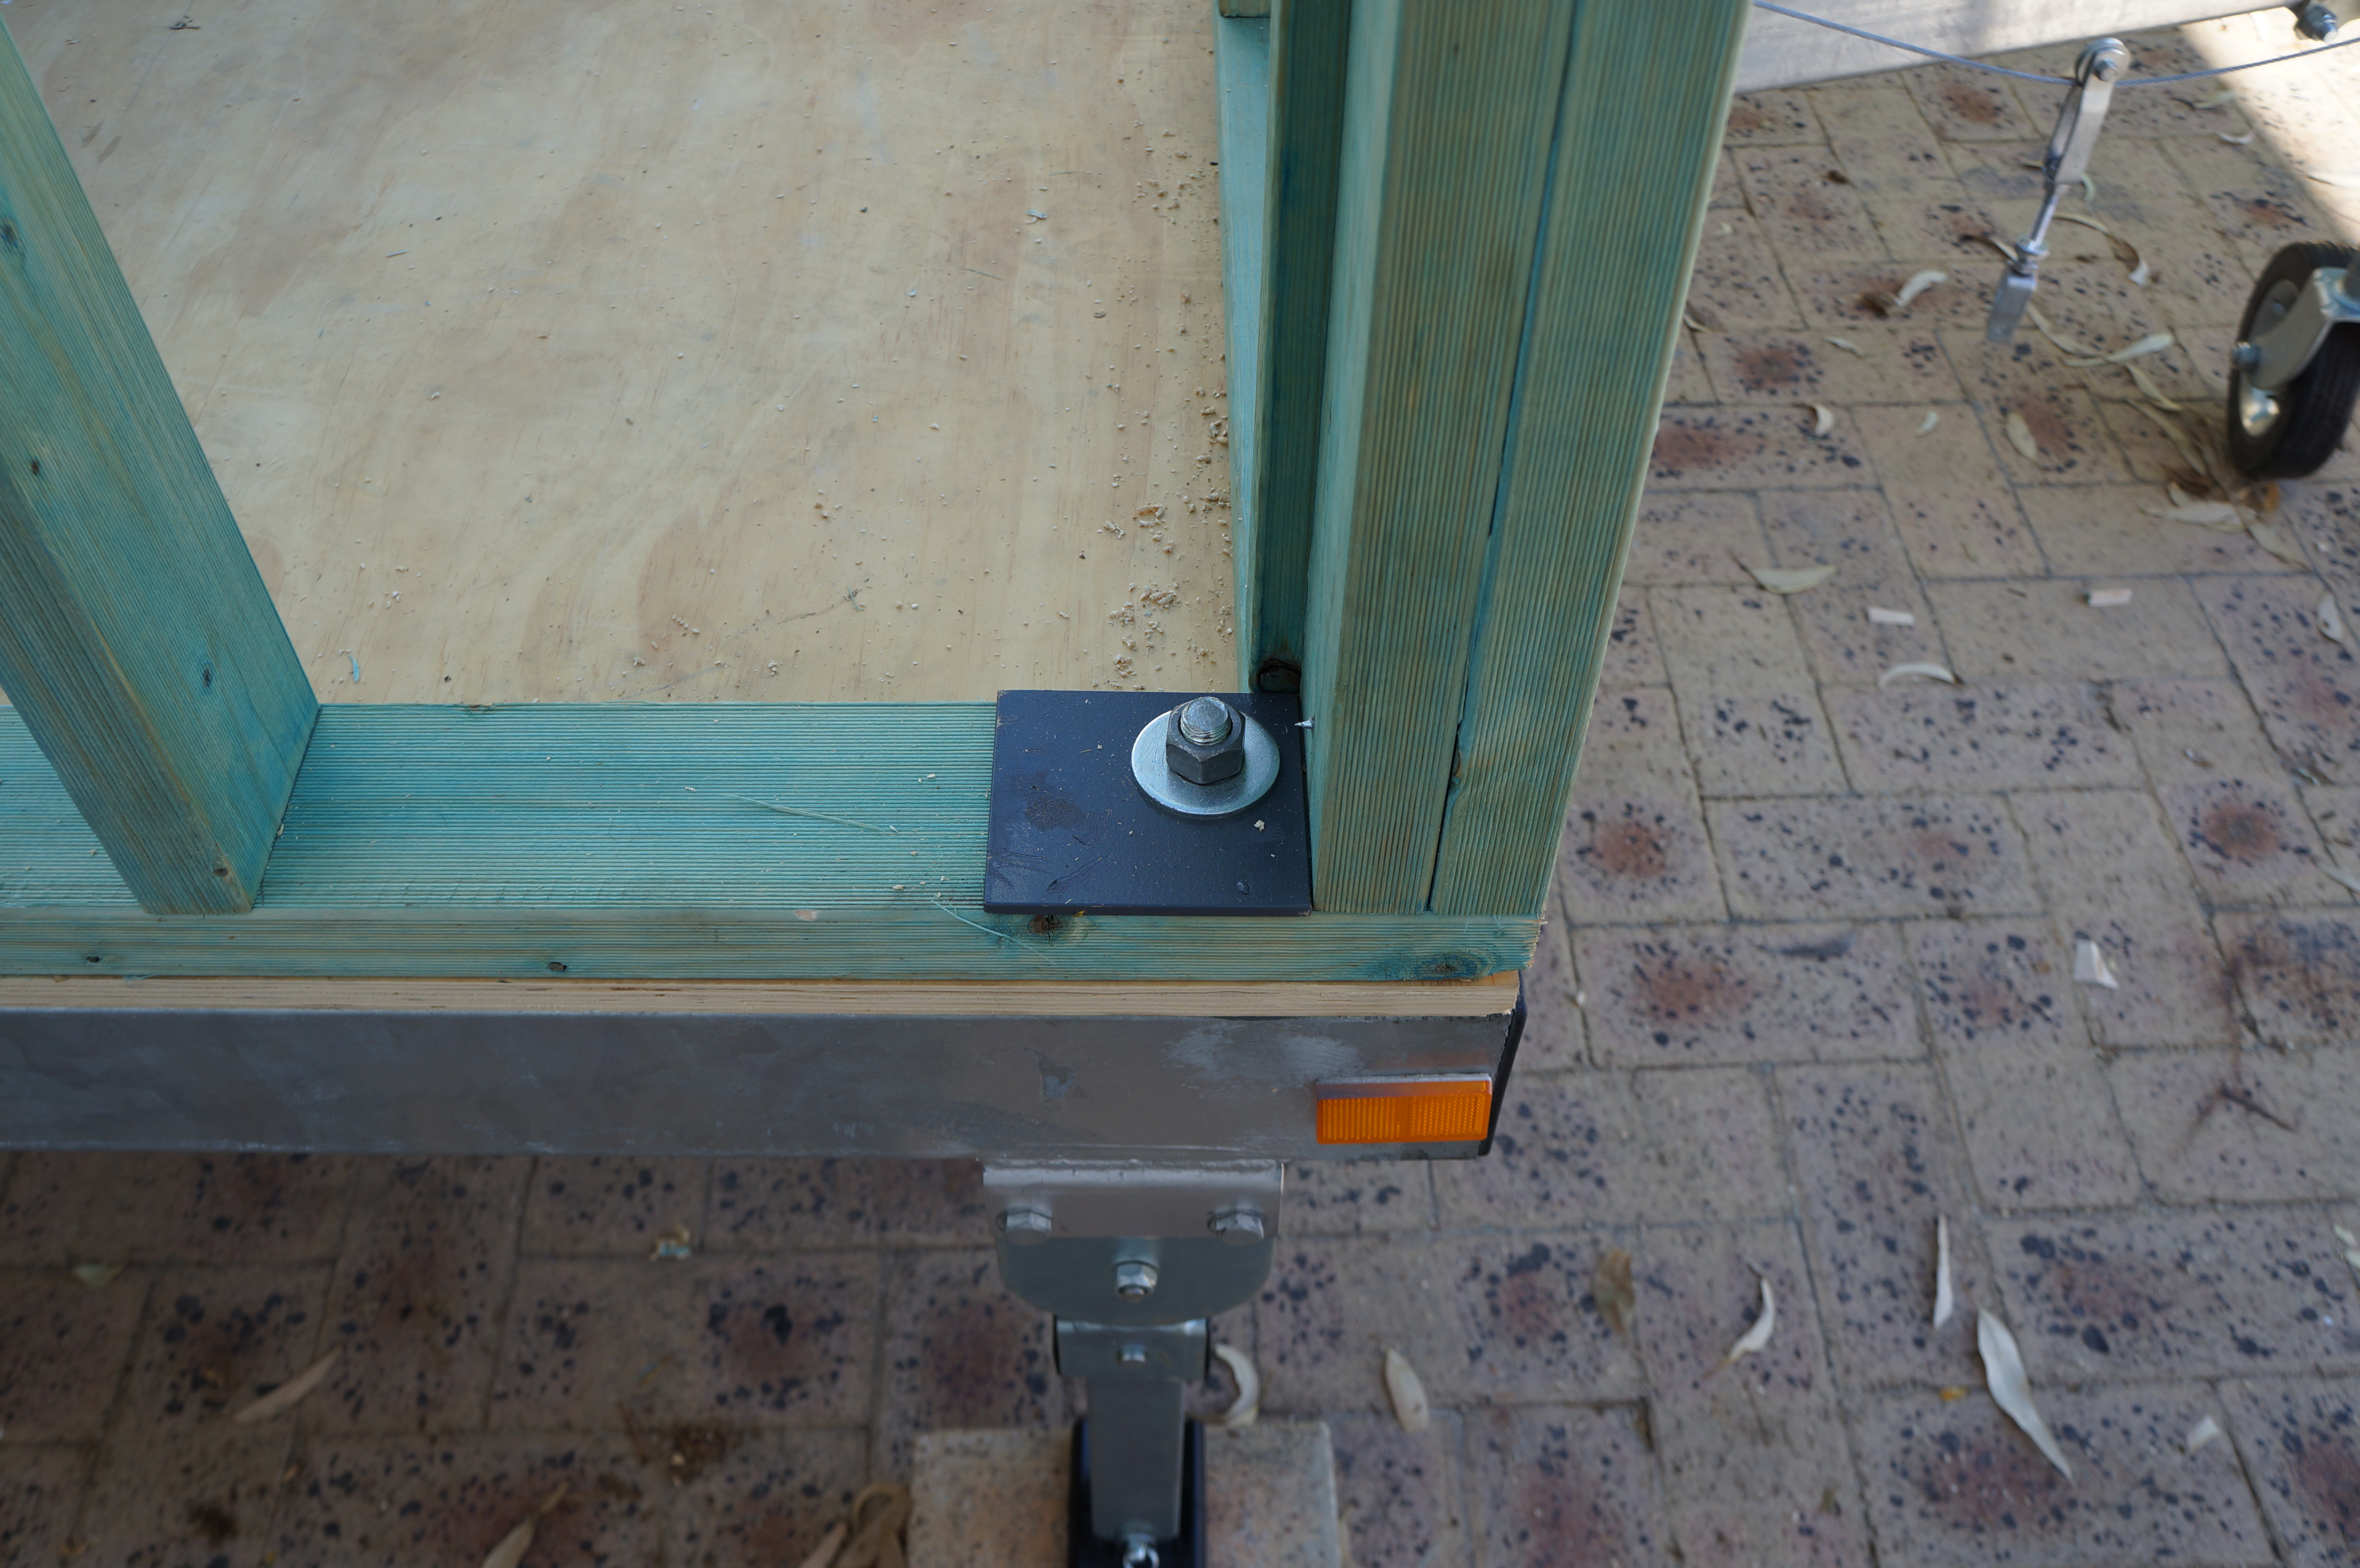
Fixing your tiny house framing to the trailer is also a very important consideration in your tiny house build as this is the main structural connection of the entire house build. It connects your beloved house with its foundation. Without the house on the trailer you have only a trailer and without the trailer you have dirt for a floor. Not a very attractive proposition! So we need to take care to make sure that this connection is structurally sound by using enough of the right fixings. If your trailer is a Tiny Real Estate Trailer then you will have no problems here as all of our trailers are designed and manufactured with mounting studs that provide this connection. In addition to mounting studs on our trailers we also recommend fixing through your wall bottom plates and down into your trailer chassis at 1200mm maximum centres using minimum 12g tek screws that are long enough so go all the way through and into the chassis frame.
If your trailer does not have mounting studs then you will need to drill and bolt down your walls using a minimum of M12 bolts at a maximum of 1200mm centres all the way around your trailer. The length of your bolts will depend on your trailer design, the materials used for your wall frame bottom plates and also the sheeting you used to cap your trailer.
Internal Walls
With all of the external walls now complete it is time to move inside and construct any internal walls that you may want. Maybe you would like a wall to separate the main living/kitchen area from the bathroom like many tiny houses. If this is this case then we need to repeat the steps above for the bathroom wall frame but this time it pays to check measurements on the job. Since you now have framework in place where the bathroom wall will go you can measure exactly the size it will need to be to fit nice and snug. Take a measurement at the bottom of where the wall will sit, across the floor from one side to the other. This will be the overall width you will use when making your wall. The height can be whatever it is on your drawing as this isn’t going to be effected by anything.
Once it is all built and you are happy with its size and you have checked it for square then we can now mark our floor where this new wall is going to sit. Mark some neat lines across the floor to give you a guide when installing. Now all that is left to do is to screw/nail it in place.
Your Tiny House Loft!

The tiny house loft bedroom. That special and unique space that tiny houses are renowned for. Your own potential star gazing observatory that you get to visit every night! This is the last piece of the internal framework and an exciting part to. As this is where you get to see the internal space come together in its entirety and get a feel for the space of the bathroom and the loft.
Constructing the loft is very much the same process as all of the other frames built previously. Like the bathroom wall though it pays to check our measurements on the job since we now have walls in place that we can check measurements from our drawing against. So take measurements in a few locations and then compare these to the drawing. If you notice that the measurements you have taken are slightly bigger or smaller this is quite normal. If you take a close look at your walls frames looking along them from front to back you will more than likely notice that they have a slight bow in them. This is just the nature of working with timber. It’s never perfectly straight! The best option if this is the position you find yourself in is to take your measurement at the floor level instead of up high. This is because we have screwed the bottom of the walls in place so we know that these are correct.
Now we have our measurements we can frame up our loft on the floor according to our drawing. Once you have it all ready to go then you will need to get a helping hand to lift it into position. Again, make sure you have all of your tools ready to go near where you will be positioning the loft before moving it and decide on how you will lift it and get in into position. Now all that’s left to do is get it in position, check that it is level and then securely fasten it to our wall framing using the correct fasteners. Refer to your drawing for any specific details on this.
Tiny House Roof Framing
The only part missing now from the completion of your timber framing is the roof. The last piece of the framing puzzle that ads structural integrity to the entire structure and further helps you to visulaise and appreciate what your completed tiny house will look like. The roof of a tiny house can take many shapes and forms depending on your unique needs and wants. Lets take a look at a few of the options.
Roof Styles
- Skillion (side to side or front to back)
- Pitched (side to side or front to back)
- Gabled
Most commonly tiny houses are constructed using either a skillion roof (which is basically a flat roof with a lean in one direction to allow for rain water runoff) or a pitched roof. These two styles work well with tiny houses, they are easy to build and look great with a small roof. What you choose is totally a matter of choice.
There are however a couple of considerations that should be taken into account before deciding. A skillion roof is more of a modern style of roof so it is great if this is the look you are trying to create. It is also super simple to build and great for rain water run-off because you only need one gutter along the lowest edge as opposed to two gutters on a pitched roof. The other great upside to a skillion roof is the ability to orientate it so that you achieve maximum head room on the side of the house where you need it the most. A very hand feature in a tiny house where head room is a premium in a loft bedroom scenario!
A pitched roof on the other hand is a more traditional style of house roof that has been around a very long time. Therefore it is well suited to exterior and interior styling that matches this theme. That’s not to say that a pitched roof is solely a traditional style though. Pitched roofs have actually been experiencing a bit of a revival as of late with numerous modern home builders incorporating high pitched roofs into their display homes. Pitched roofs are a little more tricky to construct due to the angles involved and do require two gutters if you want to catch rain water but they look cool! They also give you the opportunity to have an exposed timber beam on the inside of your house which gives the space a real homely feel.
The Skillion Tiny House Roof
Once you have decided on the roof that is right for you it’s time to get down to business and start putting it together. A skillion roof is constructed in the exact same way that the wall frames were built so simply refer to your drawing, cut your timber, lay out the pieces and then carefully join them all together.
As the roof as a whole is very large and heavy you will want to built it as you go up on the roof or better still, build it in sections that you can safely lift into position with some help. Building it in sections will save some time as you can use the floor to easily put it all together and then all you have to do is lift it up there and fix it in position. I would suggest definitely going no bigger than about 2.4 metre long sections at a time and get plenty of helping hands and ladders ready for lifting them into position.
The Pitched Tiny House Roof
If you choose to go down the pitched roof option then the method of building it is a little different to the skillion option. It is easiest to build one piece at a time but to save yourself the hassle of getting up and down the ladder a million times we will cut all of our timber before getting up to install it and have a helper on hand who can pass us up pieces of timber as we need them.
The steps below are for a simple single pitched roof. They do not apply to a dormer style roof or a roof where the pitch changes.
Follow the steps below for a beautiful tiny house pitched roof:
- Start by referring to you drawing and make a list of all of the pieces you will need to construct the roof. Also take note of the angle of the cuts you will be making, and the exact lengths of each rafter. Note: All the rafters should be the same length in most cases but check to be sure.
- We will start by making the rafters that sit at both ends of the tiny house as these will give us a fixing point for our ridge beam which will go in next. Cut 4 rafters using a compound mitre saw for straight cuts and a jigsaw for any intricate work and cut two braces that will join and hold two rafters together. The braces only need to be about 600mm long.
- Once you have your four rafters made and braced in pairs we can get up on the roof and fix them at either end of the tiny house making sure to refer to our drawing for correct placement.
- Next we can get onto cutting and joining our ridge beam. A ridge beam is the piece of timber which runs along the very top of the roof from front to back. It is essentially the spine of the roof. It is where all of our rafters fix to. Cut your ridge beam out of the appropriate material and join it where needed to obtain the overall length that is needed. If you tiny house is 7.2 metres long then usually the ridge beam will also be 7.2 metres long but check your drawing to be sure.
- We can now lift our ridge beam into position. Make sure before starting this step you have your tools up on the roof ready to go, ladders are in position and you have anough hands to help get it up there. 3 people is ideal.
- Fix your ridge beam into position at either end where you rafters but into it.
- Now we can cut the remaining rafters. It is easiest when doing this step to mark and cut one rafter first. Check it on the job and then use it as a template to mark and cut the remaining rafters from.
- Once all of your rafters are cut we can get up on the roof with our tools and mark along our ridge beam where all of our rafters are going to sit. Also mark along the top of the walls where the other end of the rafter will sit. This will make installing them a piece of cake.
- Now working your way along the roof and install each rafter by fixing it to the ridge beam at one end and the top plate of your wall at the other.
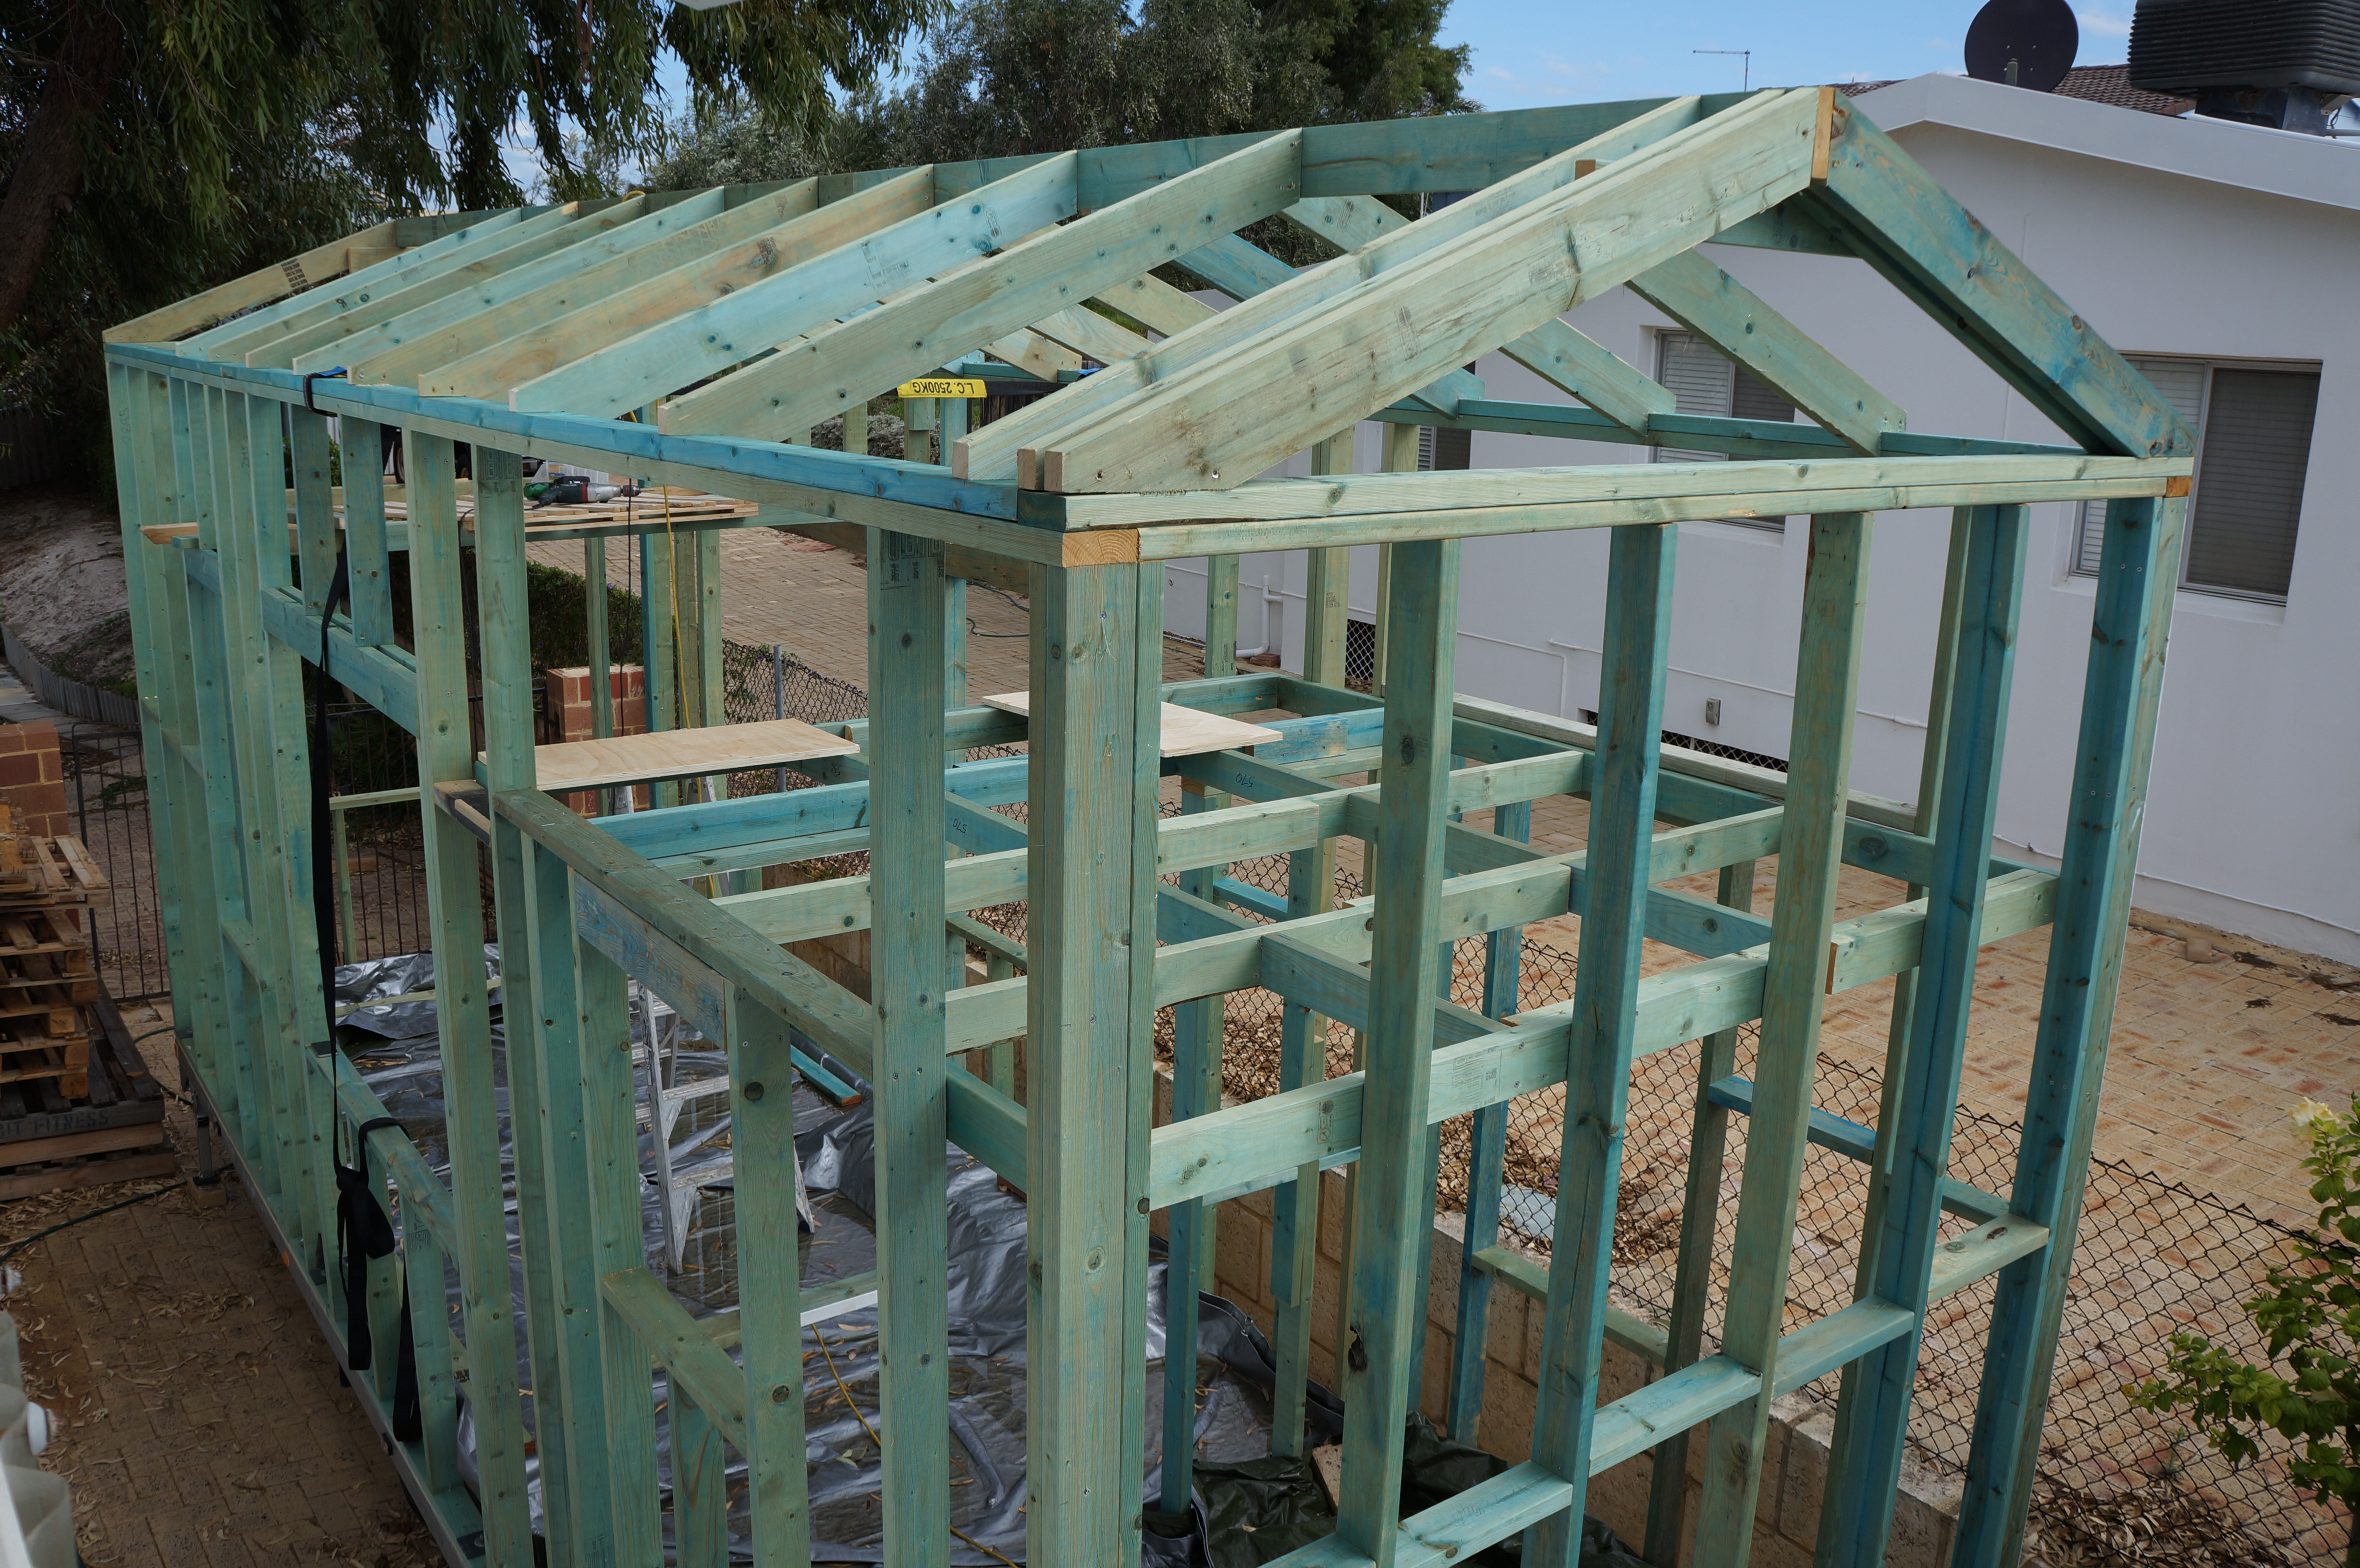
So you there you have it. You have just successfully constructed the wall framing on your first tiny house. Well done! You should feel a great sense of accomplishment as you deserve to. You can now stand back and admire your work and the fact that your tiny house dream is now taking shape in real life.
You can appreciate the overall size, the internal space and how it is all going to come together inside the space. If you enjoyed the article or found it helpful in some way please help us to help more people by sharing it. We would also love to hear about your experience in framing your tiny house so please leave a comment below!
Resources
P.S As a summary for those of you that may have skipped the article ;-).
In this article we covered how to build your tiny house from timber. We also looked at:
- What materials you can use for tiny house building and why you would consider using each one.
- What fixings to use.
- What tools you will need to do the work.
- Step by step instructions on how to build your tiny house framing.
- How to safely attach your tiny house to your trailer.
- How to build your internal walls and loft.
- How to build your tiny house roof.
Anne
on said
Awesome Adam.
Part of the video went into high-speed – was that intentional?
Anne
Adam Simmonds
on said
Hi Anne, thanks so much! Yes that was intentional. I didn’t want to make the video too long and boring. I’m glad you enjoyed it.